Plug-in development
Generally, most of the logic can be realized through script components, involving general capabilities at the engine level or business level, and can be developed in the form of plug-ins. The plug-ins are mainly composed of Component and System.
The rendering of Eva.js is based on PixiJS. Generally, plugins such as Img/Sprite/Spine actually create Pixi rendering objects, and plugins such as Stats/EvaX/Transition do not depend on Pixi. No matter what kind of plug-in, it outputs Component and System to the engine, but there are some differences in the development plan. Next, I will explain the simplest plug-in development method.
We provide a plugin template, you can click on Use this Template to directly use the template for development, with the necessary scaffolding inside.
Basic
Development
After reading this, I believe that everyone already knows about Eva.js and knows how to use it in the project. Here is a simple way to use a plug-in.
import {Demo, DemoSystem} from'.lib'
const game = new Game({
  systems: [new DemoSystem()]
})
const go = new GameObject()
go.addComponent(new Demo())
game.scene.addChild(go)
We can see that the plug-in is composed of Component and System, and a plug-in does not necessarily contain only one Component.
Therefore, the development of plug-ins needs to implement the Component and System that are exposed to users.
Plug-in operation logic
Component (Component) can give game object capabilities, we record some configurations and properties on the component. System is used to read the data on the component and realize the corresponding ability of the component.
After the system is added to the game instance, the system performs a series of corresponding operations when the components it needs to care about are added, removed, and changed to achieve some functions.
For example, in the Img plug-in, when the Img is added to the game object, a Pixi Sprite object will be created in the System and mounted on the Pixi Container corresponding to the GameObject. When the resource of the Img component changes, the System will modify the corresponding The texture on the sprite.
Next, I will explain how to design a component and how the System monitors component changes.
Build and release specifications
Development Practice
Take @eva/plugin-a11y plug-in as an example to give a detailed introduction to Eva.js plug-in development.
@eva/plugin-a11y is used to add accessibility to game objects. In DOM development, an accessible reader can read the content of HTML elements. Currently, drawing elements in Canvas cannot achieve accessibility. The @eva/plugin-a11y plug-in automatically adds by locating the position of the game object Auxiliary DOM allows game objects to be focused by an accessible reader, allowing the game to have accessibility features.
First design the Component, both need to give the ability of the game object.
Usage
import {A11y, A11ySystem} from '@eva/plugin-a11y'

const game = new Game({
  systems: [new A11ySystem()]
})

const go = new GameObject()

go.addComponent(new A11y({
  hint:'Content to be read aloud'
}))

game.scene.addChild(go)
Component Design
-Determine the component name: A11y
-Design component parameters:
-hint what needs to be read
import {Component} from '@eva/eva.js'
export default class A11y extends Component {
  static componentName: string ='A11y' // Here is the name of the Component, which is used by the System to monitor changes

  /**
   * Accessible label reading content
   */
  public hint: string

  /**
   * Initialization method, the parameters of the constructor will be passed here
   */
  init(param = {hint:''}) {
    const {hint} = param
    this.hint = hint
  }
}
System Design
-Determine the components to be monitored and which parameter changes need to be monitored -Determine the system name -Implement logic according to component changes
Step1 Determine the components and parameters to be monitored
import {System, decorators} from '@eva/eva.js'

@decorators.componentObserver({
  A11y: ['hint'] // monitor the hint attribute changes of the A11y component
})
class A11ySystem extends System {

}
In the above code, we pass the name of the component that needs to be monitored for changes and the monitoring properties into @decorators.componentObserver in order to create the listener.
If you only need to add or remove monitoring components, you can leave out specific properties, such as
@decorators.componentObserver({
  A11y: [] // Monitor the hint attribute changes of the A11y component
})
If the monitored attribute is not directly mounted on the component object, there is a level of nesting
For example, monitor the size attribute under the style attribute of component A
It can be written like this:
@decorators.componentObserver({
  A: [{
    prop: ['style','size']
  }]
})
If you want to monitor the style attribute in depth, you can write
@decorators.componentObserver({
  A: [{
    prop: ['style'],
    deep: true
  }]
})
If you want to monitor changes in multiple components, you can write like this
@decorators.componentObserver({
  A: [{
    prop: ['style'],
    deep: true
  }]
  B: ['props']
})
Step2 Set the system name
Set a name for System
import {System, decorators} from '@eva/eva.js'

@decorators.componentObserver({
  A11y: ['hint'] // monitor the hint attribute changes of the A11y component
})
class A11ySystem extends System {
  static systemName ='A11ySystem';
}
Step3 Implement logic according to component changes
Before that, we did some monitoring configuration, so how do we get the corresponding changes?
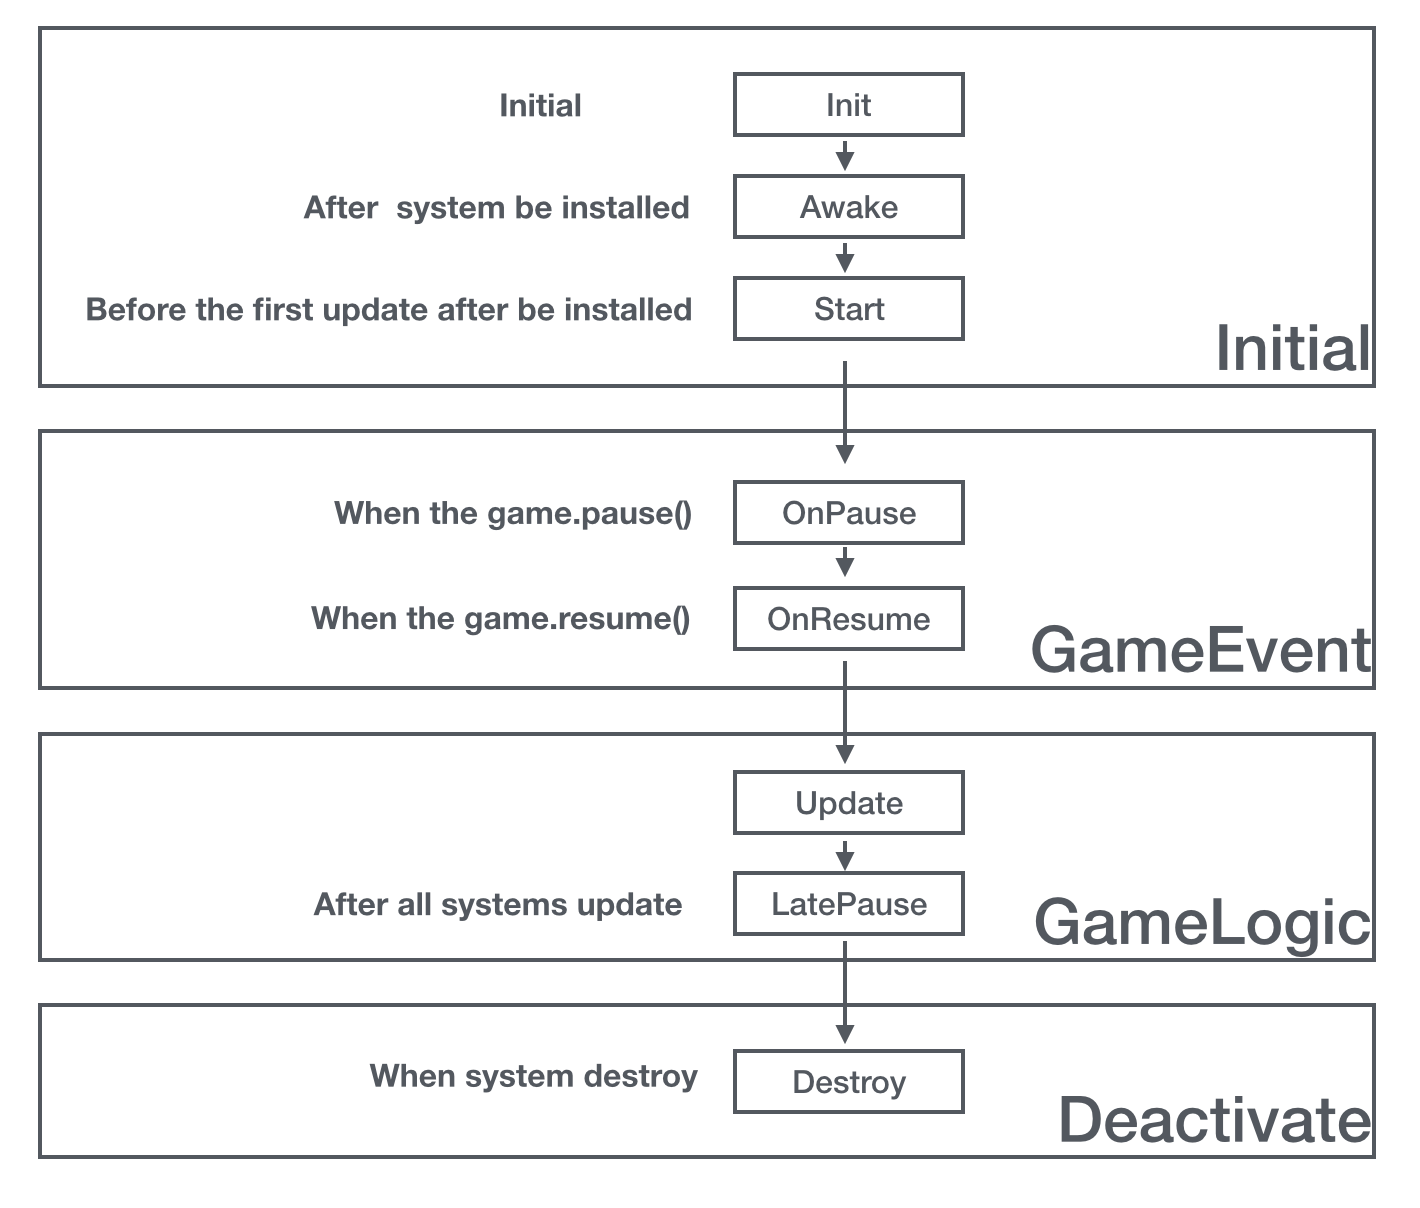
We know that System has an update life cycle, and we can get the changes of the current frame Component during the life cycle.
import {System, decorators, ComponentChanged} from '@eva/eva.js'

@decorators.componentObserver({
  A11y: ['hint'] // monitor the hint attribute changes of the A11y component
})
class A11ySystem extends System {
  static systemName ='A11ySystem';
  private elemMap = new Map()
  update () {
    const changes: ComponentChanged[] = this.componentObserver.clear() // Get all the major changes of the components that need to be monitored in the current frame, and clean up
    for (const changed of changes) {
        switch (changed.type) {
          case OBSERVER_TYPE.ADD:
            this.add(changed);
            break;
          case OBSERVER_TYPE.CHANGE:
            this.change(changed)
            break;
          case OBSERVER_TYPE.REMOVE:
            this.remove(changed);
            break;
        }
      }
  }
  add(changed) {
    if (changed.componentName ==='A11y') {// If there are multiple components, they need to be processed separately
      const component = changed.component as A11y
      const elem = document.createElement('div')
      elem.setAttribute('aria-label', component.hint);
      this.elemMap.set(component, elem)
      document.body.append(elem) // add to body
    }
  }
  remove(changed) {
    if (changed.componentName ==='A11y') {// If there are multiple components, they need to be processed separately
      const component = changed.component as A11y
      const elem = this.elemMap.get(component)
      elem.remove() // remove elem
    }
  }
  change(changed) {
    if (changed.componentName ==='A11y') {// If there are multiple components, they need to be processed separately
      if (changed.prop?.prop[0] ==='hint'){ //If there are multiple monitoring properties that need to be processed separately
        const component = changed.component as A11y
        elem.setAttribute('aria-label', component.hint);
      }
    }
  }
}
The corresponding type of ComponentChanged is like this, you can refer to it, you don’t need to implement it in the code
export interface PureObserverProp {
  deep: boolean;
  prop: string[];
}

export enum ObserverType {
  ADD ='ADD',
  REMOVE='REMOVE',
  CHANGE ='CHANGE',
}

export interface ComponentChanged {
  type: ObserverType;
  component: Component;
  componentName: string;
  prop?: PureObserverProp;
  gameObject?: GameObject;
  systemName?: string;
}
Now we have created the DOM and placed it on the body. In terms of ability, we have completed the specific functions, because screen readers can already read the elements in the game, but it seems that some content is currently lacking, such as: unable By triggering DOM click events to trigger clicks in the game, the DOM has no width, height and positioning.
If you want to implement these functions, you have to get other components under the current component to implement the functions. If you want to trigger a click event, you need to determine whether Event component is installed. If it is installed, you can follow The event bound to Event triggers the corresponding event. If you want to get the width and height position, you can get the Transform component of the game object
To increase the monitoring of the Event component, do the corresponding operations in the above add and remove methods.
@decorators.componentObserver({
  A11y: ['hint'] // monitor the hint attribute changes of the A11y component
  Event: [] // Event add delete monitor
})
class A11ySystem extends System {
}
For the position and width and height, you can get the Transform corresponding to the GameObject when the A11y component is added. Here is just an example
add(changed) {
   if (changed.componentName ==='A11y') {// If there are multiple components, they need to be processed separately
      const component = changed.component as A11y
      const elem = document.createElement('div')
      elem.setAttribute('aria-label', component.hint);
      this.elemMap.set(component, elem)
      document.body.append(elem) // add to body


      const transform = changed.gameObject.transform
      elem.style.width = transform.size.width +'px'
      elem.style.height = transform.size.width +'px'
      elem.style.x = transform.position.x +'px'
      elem.style.y = transform.position.y +'px'
    }
}
Plug-in based on PixiJS
Take the picture component as an example:
  import {
    GameObject,
    decorators,
    resource,
    ComponentChanged,
    RESOURCE_TYPE,
    OBSERVER_TYPE,
  } from '@eva/eva.js';
  import {
    RendererManager,
    ContainerManager,
    RendererSystem,
    Renderer,
  } from '@eva/plugin-renderer';

  @decorators.componentObserver({
    Img: [{prop: ['resource'], deep: false}],
  })
  export default class Img extends Renderer {// Based on PixiJS rendering plug-in, our System needs to inherit from a unified Renderer class
  rendererSystem: RendererSystem;
  init() {// Get the rendererSystem in init to add Pixi objects later, and the current system needs to be registered in the rendererManager.
    this.rendererSystem = this.game.getSystem(RendererSystem) as RendererSystem;
    this.rendererSystem.rendererManager.register(this);
  }
  rendererUpdate(gameObject: GameObject) {// rendererUpdate replaces the Update method, because update has been implemented in the Renderer class
    const {width, height} = gameObject.transform.size;
    if (this.imgs[gameObject.id]) {
      this.imgs[gameObject.id].sprite.width = width;
      this.imgs[gameObject.id].sprite.height = height;
    }
  }

  async componentChanged(changed: ComponentChanged) {// The update method is implemented in the Renderer class, and the component change corresponding to Img is passed to componentChanged
  if (changed.componentName ==='Img') {
      const component: ImgComponent = changed.component as ImgComponent;
      if (changed.type === OBSERVER_TYPE.ADD) {
        const sprite = new Sprite(null);
        resource.getResource(component.resource).then(({instance}) => {
          if (!instance) {
            console.error(
              `GameObject:${changed.gameObject.name}'s Img resource load error`,
            );
          }
          sprite.image = instance;
        });
        this.imgs[changed.gameObject.id] = sprite;
        this.containerManager
          .getContainer(changed.gameObject.id)
          .addChildAt(sprite.sprite, 0); // Put the created Pixi rendering object into the Pixi container corresponding to the GameObject
      } else if (changed.type === OBSERVER_TYPE.CHANGE) {
        const {instance} = await resource.getResource(component.resource);
        if (!instance) {
          console.error(
            `GameObject:${changed.gameObject.name}'s Img resource load error`,
          );
        }
        this.imgs[changed.gameObject.id].image = instance;
      } else if (changed.type === OBSERVER_TYPE.REMOVE) {
        const sprite = this.imgs[changed.gameObject.id];
        this.containerManager
          .getContainer(changed.gameObject.id)
          .removeChild(sprite.sprite);
        delete this.imgs[changed.gameObject.id];
      }
    }
  }
life cycle
to sum up
Through the combination of Component and System, we can implement a variety of common plug-ins. In daily development, we only need the capabilities provided by CustomComponent to develop game logic.